2. Getting Started
2.1 Introduction
To begin the development process, this chapter outlines the steps required to create your own custom extension and load it into Chrome. Section 2.2 First Chrome Extension begins by describing the process of developing your first Chrome browser extension, by outlining the structure of an extension and the required files. After your extension has been developed, Section 2.3 Loading Your Extension describes the process of viewing the extension administrator page and loading your first extension into Chrome. As debugging is a large part of development, the process of locating the individual developer consoles for your extension is then described.
As Chrome extensions have the ability to interact with the browser, Section 2.4 Chrome Extension Theory outlines the core theory behind how extensions work and the permissions they have available to them. Finally, Section 2.5 Summary reviews this chapter and lists takeaway tips from this chapter.
2.2 First Chrome Extension
An extension in its most basic form is a folder that contains a required file titled manifest.json to describe the extension to the browser, and the additional HTML, JavaScript, and CSS to add functionality. To get started, we begin by creating a folder titled firstextension. The file structure for the folder is shown below:
File Structure
- /firstextension/manifest.json
- /firstextension/icon.png
- /firstextension/interface.html
- /firstextension/popup.js
Source: /ch2/first_extension
Inside this folder, we include the manifest.json. This file is a JSON-based document that defines the basic attributes of our extension, such as the title, description, and permissions required by the extension. The icon.png is a simple PNG icon that is shown in the menu bar of the browser, which acts as a button that the user can click to interact with the extension. When the user clicks on the icon, the extension opens the simple HTML interface defined in the interface.html file.
When working with extensions, a clear separation is needed between the HTML and the JavaScript it uses. For this reason, a file titled popup.js is added, which contains the JavaScript required for the interface.html file. Next, we will explore the contents of each of these files.
File Name: manifest.json
The manifest file is a JSON-based document that is used to describe the specific details of the extension. At the very top of this file, the manifest_version attribute is first added. This is the specific standard the manifest is adhering to. In this case, version 3 is defined as it is the most recent version. The name attribute is then used to define the name of the extension. The description attributes follows this, which contains a brief one-line description of the extension. These pieces of text will be visible when the extension is loaded into Chrome later.
As we will have many different iterations of the extension, a version number attribute is added to keep track of the current version. After this, an attribute titled action is added. This defines the default action the extension performs when the extension icon is clicked. Here, the default_popup attribute is set to interface.html to open the HTML file when the icon is clicked. The default_icon attribute is then added to set the icon itself. The icon used is defined as icon.png, which is a simple PNG smiley face icon.
{
    {
    "manifest_version": 3,
    "name": "First Extension",
    "description": "My First Extension",
    "version": "1.0",
    "action": {
        "default_popup": "interface.html",
        "default_icon": "icon.png"
    }
}
File Name: interface.html
When the user clicks on the extension icon, the interface.html file is then shown to the user. This file is a simple HTML-based document that displays the text My first extension!. After this, a <script> tag is used to make a reference to the popup.js file. This file contains any additional JavaScript that we want to use. Much to the frustration of many developers, no JavaScript can be directly added to this HTML file; it all must be contained in the external popup.js file.
<html>
<body>
    <h1>My first extension! </h1>
    <script src="popup.js"></script>
</body>
</html>
File Name: icon.png
The icon for the extension is a simple 24 x 24 pixel PNG file which contains a smiley face as shown in Figure fig:smiley_face_icon. This icon is shown to the user in Chrome's menu bar when the extension is loaded.
![]()
File Name: popup.js
As no JavaScript can be added to the extension's HTML user interface, it is instead contained in the popup.js file. When the user clicks the extension's icon in the browser's toolbar, the interface.html file is loaded which, in turn calls the popup.js file. In this file, a single line is added to print a simple message to the developer console.
console.log('We are in the popup!');
Once all the files are saved in the firstextension folder, we do not need to perform any additional tasks to package the extension before using it. We can now move on to the next step to load the extension into Chrome. Section 2.3 Loading Your Extension, next, describes this process.
2.3 Loading Your Extension
A Chrome extension in its simplest form is a folder that contains HTML, JavaScript, and CSS files. When we wish to load an extension into Chrome, open Chrome and enter the following address into the URL bar chrome://extensions/ and press enter. This is the extensions administrator page that provides a list of all the extensions currently installed in the browser, as shown in Figure 1.

Figure 1: Chrome extension administrator page showing a list of installed extensions.
On the top-left corner of this page, as shown in Figure 2, a button titled Load unpacked can be seen. Click this button to begin loading the extension into the browser.

Figure 2: Click Load unpacked to load a new extension.
A file browser will then open, allowing you to navigate to the location where the new extension folder is located. Once located, click Select as shown in Figure 3 to load the extension.
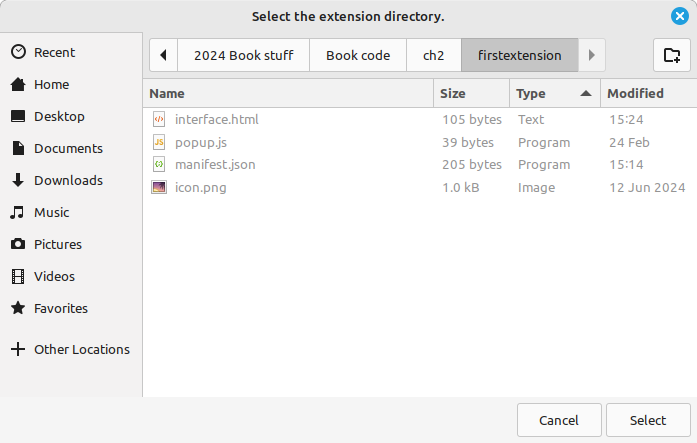
Figure 3: Selecting the folder of the new extension.
After an extension is loaded, the default name and description attributes from the manifest.json file can be seen as shown in Figure 4. In the future, after changes are made to the extension code, the circle arrow on the bottom-right can be clicked to reload all the extension files. To temporarily disable the extension at any time, the blue toggle button beside this can be clicked.

Figure 4: Chrome extension details box.
On the bottom-left corner, when the Details button is clicked, a complete listing of the extension permissions and details can be seen as shown in Figure 5.
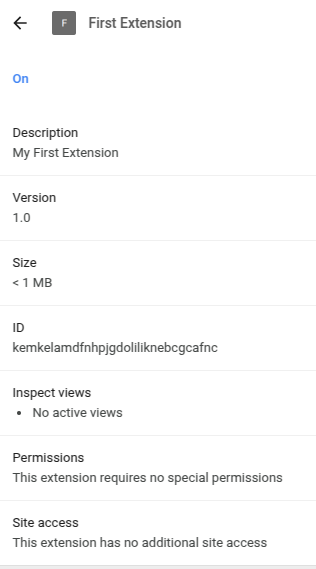
Figure 5: Listing the details and permissions of a single extension.
When the extension has been loaded, the icon may not yet be visible in the menu bar. To pin the icon to the menu bar to make the extension more easily accessible, click the puzzle piece icon beside the address bar, and a list of the installed extensions will be shown. We can then click the pin icon beside the extension name to pin the icon to the toolbar as shown in Figure 6.
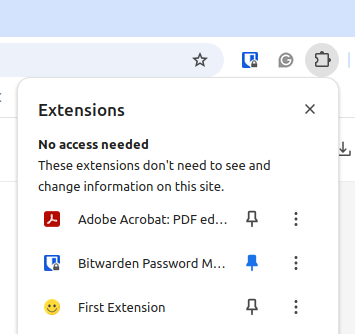
Figure 6: Pinning the extension icon to the menu bar.
Once the icon is pinned to the toolbar, we can click the icon to open the user interface as shown in Figure 7. This user interface is coming from the interface.html file created earlier.
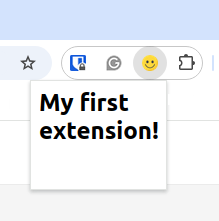
Figure 7: Viewing your first extension.
When developing extensions, Chrome comes with a number of different developer consoles that allow us to inspect errors and messages that have been logged from the extension. These developer consoles can be broken into two groups:
- The console for the web page that is currently loaded in the browser.
- The consoles for the files that make up an extension.
To view the web page console, we can press the Ctrl+Shift+j keys together. The developer console will then open as shown in Figure 8.

Figure 8: Chrome developer console for a web page.
To view the developer console for an extension's individual file, such as the user interface, we can click on the extension to show the interface, and then right-click to show the Inspect button, which opens the developer console associated with it.
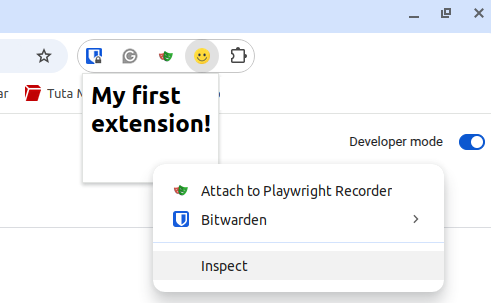
Figure 9: Opening the developer console for the extension's user interface
In Figure 10, we can see the developer console for the interface.html file. As this file included a reference to the popup.js file, we can see the output from the console log command.
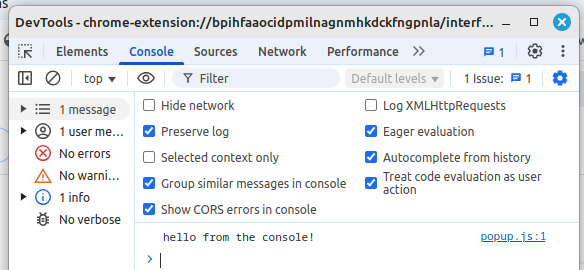
Figure 10: Viewing the developer console for the extension's user interface.
Now that we have developed and loaded our first extension, we can begin exploring the theory behind Chrome extensions in Section 2.4 Chrome Extension Theory.
2.4 Chrome Extension Theory
In our extension folder, we can add any number of different HTML, JavaScript, and CSS files that we require. However, as the extension may require different functionality at various times, there is a distinction between the types of JavaScript files we add and the features available to them. These JavaScript files can be broken down into three core types:
- Background / Service Worker Scripts - These JavaScript files are designed to run in the background and do not interact with the actual web page the user is viewing. Commonly, we can use this background script to listen for extension events such as clicks the user performs. These files can be loaded or unloaded as needed. These are independent of individual tabs in the browser.
- Content Scripts - These scripts can interact with the web page the user is currently viewing. These files can modify the content of a web page and have access to the web page's Document Object Model (DOM). They also have limited interactions with the Chrome API.
- Extension JavaScript files - As JavaScript is needed to perform different tasks, regular plain JavaScript files can also be included. These, however, have limited reach into the functionality of Chrome itself.
As mentioned before, the manifest.json file in the extension defines the main attributes of the extension. In this manifest, the most important attribute added is the permissions attribute. This is where we can define what access and abilities the extension has.
Below is an example of a manifest with the permissions attribute. In this example, the tabs permission was added, which allows the extension to interact with the tab the user currently has open in their browser. After this, the storage attribute is added to allow this extension to interact with the browser's storage.
{
{
"manifest_version": 3,
"name": "My Sample Manifest",
"description": "This is my sample manifest",
"version": "1.0",
    "permissions": [
    "tabs",
    "storage"
    ]
}
There is a wide collection of permissions that an extension can have, depending on the role of the extension. During the installation process of an extension, the user is prompted with a list of the permissions the extension requires before it is installed. Below is a brief listing of some of the core permissions an extension can have, along with a brief description of each.
- activeTab: Allow the extension to view the active tab in the user’s browser.
- contextMenus: Allow an extension to access the right-click menu when the user is on a web page.
- cookies: Allow an extension to read and write the browser cookies of sites the user visited.
- documentScan: Allow an extension to scan documents with available hardware.
- downloads: Provide the extension with access to download files, monitor downloads, and view files downloaded by the user.
- history: Access to the user's history in the browser
- pageCapture: Allow the extension to capture the current web page as a .mhtml snapshot file.
- scripting: Allow the extension to run scripts programmatically.
- sessions: Allow the extension to query and restore tabs from browsing sessions.
- sidePanel: Allow the extension to open as a side panel in the browser.
- storage: Allow the extension to save and retrieve data from storage synced across the user’s devices or locally.
- tabs: Allow the extension to have full access to the browser's tabs to query, create, update, move, and gather information from them.
- topSites: View the list of sites the user commonly visits.
- tts: Allow the extension to perform text-to-speech.
As extensions can interact with a wide range of browser features, the complete listing of permissions can be found on the official Chrome documentation. (link) In the following chapters, individual permissions will be used in sample extensions to explore the functionality available.
2.5 Summary
This chapter described the process of creating your first Chrome extension and loading it into Chrome. Chapter 3, next, describes examples of the core functionality that Chrome extensions have available to them.